Ok I know if I mention treating the pet or the carpets you’re gonna hit the back button lickidty split because every site says this so I won’t say a word about those two-Deal? Deal. So here’s the scoop on some inside knowledge that bug men have been keeping from you for years (not really) and once you start addressing these spots your flea control is gonna reach a whole new level. These spots are critical in any flea work yet we walk right by them everyday as the fleas hop on our socks and plague our precious pets and we wonder why our bombs and ‘scorched earth’ approach just isn’t working.
#1 Shaded areas
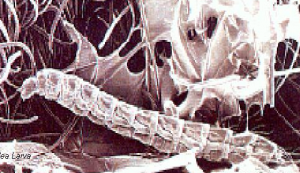
Did you know that fleas are holometabolous? Relax that’s not some sort of a disease, it refers to their complete metamorphosis or change. Like a caterpillar to a butterfly the young look nothing like the adult and in fact most eat different things, have different habits and need to be treated differently in most cases. Fleas go from the egg to a larva and from larva to pupa. Pupa is the last stage before adult like in our caterpillar example. We’ve all seen cocoons right? Well that is the pupa stage and fleas do it too. So if we can catch the flea larvae just before it pupates then wham, we’ve stopped them before they even get a chance to take their first blood meal. The place to stop them most often is, you guessed it, in shaded areas. Just about the time the larvae are ready to pupate these little maggot like creatures wriggle to darkened secluded areas where they’ll enter into the next stage- pupation. So if you want to stop more fleas this will be a prime spot and your best weapon of choice is an IGR (integrated growth regulator) product. Methoprene is a chemical which inhibits fleas growth and won’t allow a larva who has come in contact with it to mature. Larvae that don’t mature means fleas you don’t have and that’s gotta be good. Since most flea infestations are 75% larvae which you’ll hardly ever see it stands to reason you should know the best place to get these little guys and get em good. Since the larvae aren’t super mobile, in your home the areas to concentrate on are; just underneath the first 3 or 4 inches of throw rugs, furniture, beds, pet crates and the list can go on. The point is don’t stop treating at the edges of objects, make sure to go just beyond into the dark (with a flashlight-cats hate being sprayed in the face) and treat with an IGR to set up your barrier for the 75% you never knew was there.
#2 Cardboard scratch pads and vacuums
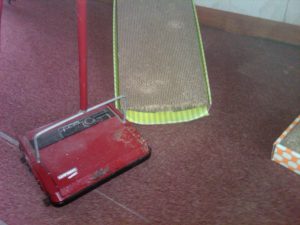
I just lumped these two together cause I had such a good picture. Scratch pads should be treated because the open cells offer a safe landing spot for eggs right off the cat and we all know what hatches out of the eggs- more trouble. Now I said treated BUT I didn’t say sprayed and this is where our good friend Mr. Vacuum comes in. Spraying cardboard is not a good idea number one because the material will just soak up your pesticide and little will be left on the surface to do any good. Add to this that it’s really just eggs we’re going for here and the shells of flea eggs are pretty impervious and will survive your spray. While you could have a larva or two in the cells it won’t be many and adult fleas won’t be happy in the combs either and simply hop out. Eggs however are often laid on the animal but are not  sticky or cemented so the roll off just about anywhere. Cats get pretty intent around these scratch pads and I’ve seen dozens of eggs drop right out when you flip one over. So the tip on these pads is to simply turn em over, tap and shake and then vacuum up the debris.
For your vacuum (area #2b) you definitely want to get some control in that bag. Normally the dust inside is more than enough of a hostile environment that the different stages die. Adults and larva breathing tubes get blocked with all the dust so they do die but I’ve opened a few in my time only to have my arm covered the minute I unzipped it. DON’T USE INSECTICIDAL DUSTS but a nice talcum or baby powder sucked up in the cleaner will work real well. Simply sprinkle some on the floor and vacuum it up. The fine powder should do the trick where normal dust and debris might fail. Then of course wrap the bag up in another plastic garbage bag and throw it away.
#3 Your car
This area is most often forgotten but if you transport your pets anywhere in your vehicle then it too should be treated. Many times our cars are actually feeder systems for our flea infestations. They may not bite you per se but hop on to your pant leg, take a ride inside and just like that you have more fleas to deal with. I suggest a visit from our buddy the vacuum and then I use Precor 2000 Plus to treat a vehicle. It dries quickly, has a 6 month residual and has the IGR right inside it so you’ll not only get your adults but the larvae too.
So there you have it 3 critical areas to enhance your flea control program. Now before you go and fire your bug man let me say that there are so many more things you need to know and have (equipment wise) to really handle fleas effectively and still be safe. As chemicals get better and do it yourself application tools improve it can be tempting to go it alone thinking you’ll be saving money. So often this is an expensive mistake and if I had to write a Forth item for critically forgotten for this article it would be your local bug man. He or she has all this information embedded in their brains and sometimes it’s best to call in a pro, you know, before it gets critical.


