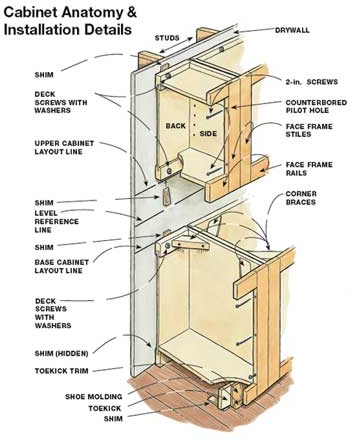
Have you ever thought about the anatomy of a cabinet? I think most of us know to look under the sink or spin the lazy susan around while looking for pests. Have you ever seen a cabinet with the counter top pulled off? There are so many nooks and crannies, ledges, walkways, shields, holes, voids and secret passages that it’s any wonder at all we can effectively treat any cabinet in the kitchen. This is especially true when we are having a hard time trying to kill those last remaining german roaches that escape us month after month or when drawers and cabinets are so tightly packed you can’t seem to apply anything safely. Knowing the anatomy of a cabinet is key to any successful pest control job.
I challenge you.
Try something for a week and see if your results don’t improve dramatically. Then whenever you have a stubborn problem in the future you’ll know right where to go and what tools to use. For the next 5 days I want you to stick your head up,–don’t get ahead of me– way up under the sink with a good flashlight and really take a look around. Pull some drawers all the way out and look at the back end of those cabinets and see what a bug sees. I’ll bet you’ll see escape routes and hiding spots that you’ve never seen before. Take note of how older cabinets are put together as opposed to newer homes. Is the back wall part of the cabinets or do you see the kitchen wall and there is no backing? Look up at the framing, does it lead to the next drawer over which allows free run for roaches or is it closed up and contained? I can go on and on with things you should notice but if you’ll do this for just one week you’ll have a great overview of how these things are made and be much better prepared to attack any pest problem in the future.
Having the proper tools is the second step in our exercise.
Any cabinet work is going to have to include extenders of some sort unless you are a great contortionists. Bait gun extenders should be on
the belt of every technician because it makes it so easy to reach almost anywhere. Dusters with extensions that are curved at the tip come in handy and straw tips on your aerosol help you direct spray into a crack or void rather than all over some pots and pans. 4 way fogger tips are nice for that void between the cabinet backing and the kitchen wall if you can get the straw deep enough and a system III can really free up some room since the can stays on your hip. Cabinet work is tight and you are treating around some very sensitive stuff so make sure you have the proper application tools.3 commonly overlooked spots.
#1 Most cabinets have false bottoms and mice, rats, roaches, ants and spiders love them. Not all false bottoms are readily accessible but you can check by running your hand along the base just under the cabinet door. If the baseboard of the cabinet doesn’t go all the way up you should be able to stick the tips of your fingers into the void. Remember however, each cabinet can be a separate unit just placed side by side. In that case the void is only as wide as that cabinet so you’ll need to treat under each cabinet individually.
 #2 Speaking of side by side, that is the 2nd most overlooked spot. Where the two cabinets walls should connect there is almost always about a 1/4 inch gap. The walls from either cabinet run to the floor creating not only a false bottom void but one that is as tall as the cabinet is. Imagine it as putting 2 boxes side by side but leaving just a small space. That entire narrow void is a big time hiding spot and one that I see a lot of bug people pass up.
#3 The space in between the cabinet backing and the original wall. Using our box example put the back of them up against the wall but leave just about that same 1/4 inch. This is the way most cabinets are installed and you can see a huge void exists where bugs can hide. Upper cabinets can also have this void and it’s very common to see roach fecal matter along the base of those cabinets where they enter and give their hide out away. This is the toughest void to treat at times and you might consider caulk just to seal them in or cut that escape route out. There may be other options like bait or dust but be careful on the upper cabinets because gravity is not our friend in this situation.
Whether you are an old vet or a brand new tech I think the information you gather from this one week exercise will be invaluable. I don’t do this on every home but for sure on any roach job I do. Knowing the ins and outs of the cabinets make up gives me an advantage and I’m so much more effective. I also use this approach of pulling drawers to help re-sell my service especially once the problems solved. Hubby’s not so apt to think he can do this himself when you whip out a drawer and bait with your extender. I hope you’ll take this challenge and I’d love to hear back from anyone who learned something new or saw things in a different light.


