 Vinyl siding provides a great protective barrier for our home. It was first brought to market in the 1950’s as an alternative to aluminum siding and offered distinct advantages to homeowners tired of exterior maintenance of their home. This durable relatively maintenance free plastic exterior cladding for your home promised no more painting, protection against the weather and a sharp modern look that could cover up an old drab exterior. Unfortunately, it also gave cover and safe harborage to many pests. Earwigs, roaches, ants, wasps and bees just to name a few often find your homes siding a perfect place, where they can feel protected too.
The problem with treating pests that lodge behind this shielding is that it gives you very little access to inject anything meaningful. It also hides the pests activities so you can’t gauge where a nest might be, find a conducive condition, (such as moisture) a trail or entry point and so often times your treatment is ‘off target’ and therefore useless even if you can get good coverage. Removing the siding would be great except that its interlocking design means you’d end up taking off huge sections with no real promise of getting to the core of the problem.
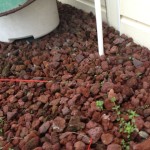
Recently I received a question on how to deal with a massive earwig problem behind the siding of a home. This reader has done everything else right yet he still has earwigs by the thousands. They actually drop out in droves when he goes around the house and taps the vinyl. This problem of immense numbers of pests thriving behind siding is not unique, so I thought I’d give you a few tips on how I treat and hopefully help you out.
Take Advantage Of What You’ve Got
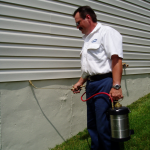
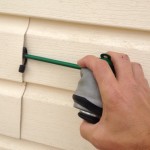
There are a few spots in siding where you can successfully introduce insecticides. First, vinyl siding has tiny ‘weep holes’ at the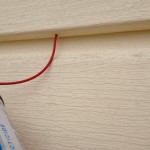 bottom of each course (panel) to allow moisture to escape. I take advantage of these tiny holes using pyrethrin aerosols and an injection straw. I’d use dusts but the ready made hole is far to small. Also- I don’t use ‘knockdown’ or ‘jet’ type aerosols as the stream of spray is going to limit your coverage and simply settle at the (inside) bottom of that course where it’s ‘J’ shape connects with the next panel. ( I believe that’s called a buttlock-
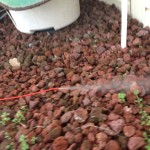
Fine mist or fog is better for the sidings void
Another spot is the ‘lap’ seams. This is where two pieces of siding overlap usually found on longer courses. This is a great spot to
The stream or jet stream type won’t give you good coverage
Channels and trim around windows, corners or utilities can offer a place for you to treat as well. Although it looks like an easy spot to treat it can be challenging. Siding trim locks together pretty good and you may need to wiggle your applicator around a bit to get a decent shot. I’d make sure to wear protective gear (like eyewear) because you often get and unexpected splash back.
The base or bottom course is often times the easiest to treat as there is most likely a ready made gap or the bottom course easily
Baiting and/or dusting the laps can be very effective (I prefer baiting for earwigs,roaches etc.)
As if treating behind siding isn’t hard enough already, some homes cladding runs all the way to the grade (soil or cement levels) or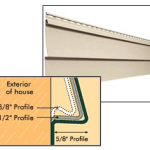 below or the area you want to treat has no lapping or weep holes. In these cases you may want to drill a small inconspicuous hole in the buttlock area so you can insert your treatments.
Also keep in mind, behind the siding (if professionally done) will be backerboard, underlayment, (a layer of plastic) and perhaps even shims, flashing or furring strips. Then beyond that may be the original siding that was covered up years ago. All of these things can get in the way of a successful placement and you’ll need to work around them. ie; treat both sides of a furring strip since your product will be blocked.
Once control is achieved it might be prudent to apply a dust up under the bottom course and/or any place that you find conducive conditions once per year. This way, the bugs that try to get started will have less of a chance and it could keep you from having to go through all that extensive work again. After all, with this much work involved it’d be best to keep this as a side job.